---
title: NVIDIA Jetson AGX Thor
description: Install WendyOS on an NVIDIA Jetson AGX Thor over USB recovery
---

import { withBasePath } from '@/lib/shared';

Jetson AGX Thor uses a dedicated USB recovery flash path. WendyOS flashes the Thor's QSPI and internal NVMe directly; no external drive is required.

WendyOS on Jetson is built on **JetPack 7.2** (L4T R39.2.0). Apps can target JetPack 7.2 or later.

## What You Need

- NVIDIA Jetson AGX Thor Developer Kit
- USB-C data cable for your MacBook or other development machine
- Supplied Thor power supply
- Wendy CLI installed on your development machine ([install it](../../#1-install-the-wendy-cli))

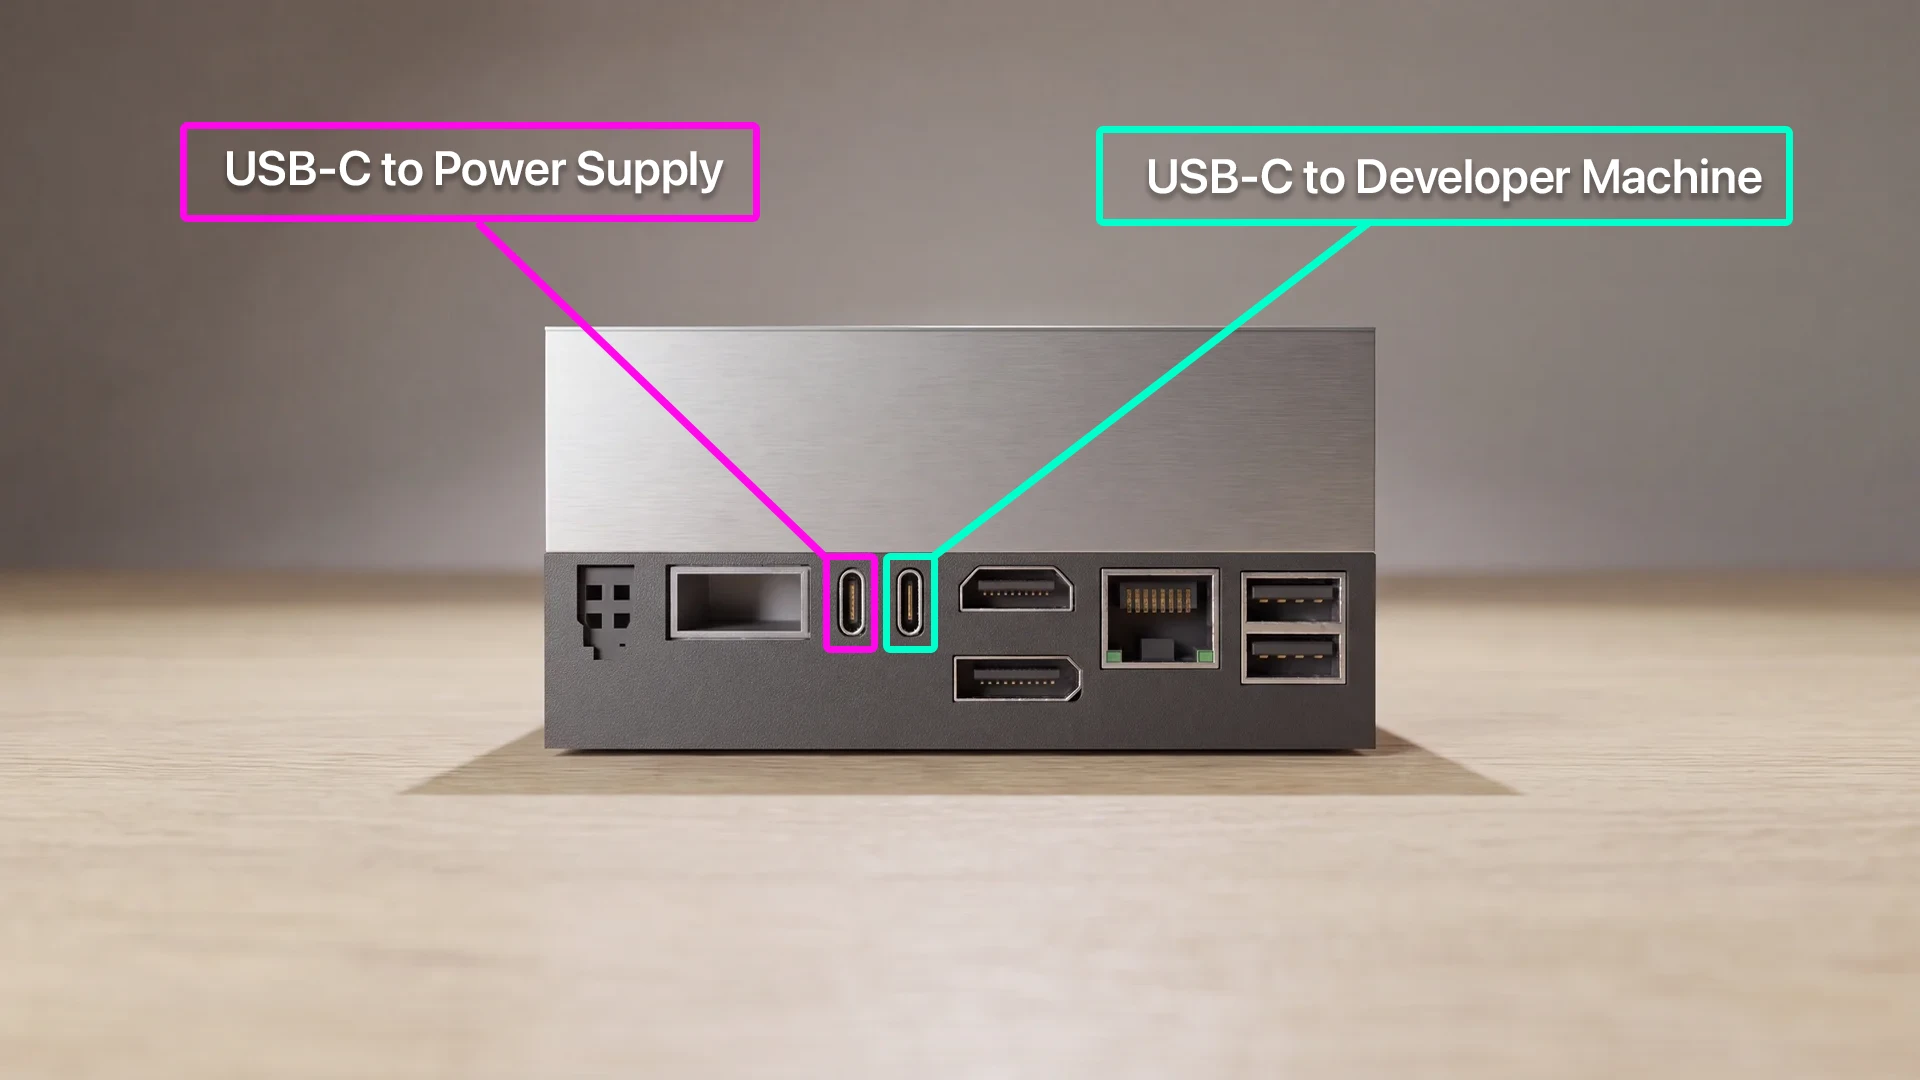
<figure style={{ margin: '1.5rem 0' }}>
  <img
    src="/latest/images/installation/jetson-thor-usb-c-ports.webp"
    alt="Rear of the Jetson AGX Thor with Power Cable pointing to the left USB-C connection and To Computer pointing to the right USB-C connection next to HDMI"
    width="1920"
    height="1080"
    style={{ width: '100%', borderRadius: '8px' }}
  />
  <figcaption style={{ textAlign: 'center', fontSize: '0.875rem', color: 'var(--color-fd-muted-foreground)', marginTop: '0.5rem' }}>
    With the rear ports facing you: <strong>Power Cable</strong> connects on the left, and <strong>To Computer</strong> connects on the right, next to HDMI.
  </figcaption>
</figure>

## Installation Steps

<Steps>
  <Step>
    ### Connect Your Computer

    Start with the Thor powered off. Connect a data-capable USB-C cable to your MacBook or other development machine.

    <figure>
      <video
        width="1280" height="720" autoPlay loop muted playsInline controls preload="metadata"
        poster={withBasePath('/images/installation/jetson-thor-computer-connection.webp')}
        aria-label="Connect the data cable to your computer's USB-C port"
        style={{ width: '100%', height: 'auto', borderRadius: '8px' }}
      >
        <source src="/latest/videos/installation/jetson-thor-computer-connection.mp4" type="video/mp4" />
        Your browser does not support embedded video.
      </video>
      <figcaption>Connect one end of the data cable to your computer.</figcaption>
    </figure>

    Turn the Thor so the **back faces you**; you should see all of the ports. Connect the other end to the **right USB-C port, next to HDMI**, labeled **To Computer** in the clip.

    <figure>
      <video
        width="1280" height="720" autoPlay loop muted playsInline controls preload="metadata"
        poster={withBasePath('/images/installation/jetson-thor-usb-c-connection.webp')}
        aria-label="Connect the computer's data cable to the Thor's right USB-C port next to HDMI"
        style={{ width: '100%', height: 'auto', borderRadius: '8px' }}
      >
        <source src="/latest/videos/installation/jetson-thor-usb-c-connection.mp4" type="video/mp4" />
        Your browser does not support embedded video.
      </video>
      <figcaption>The right USB-C port connects the Thor to your computer for recovery and flashing.</figcaption>
    </figure>
  </Step>

  <Step>
    ### Connect Power

    Plug the supplied power adapter into a power outlet, then connect its USB-C cable to the **left USB-C port** on the Thor, labeled **Power Cable** in the clip.

    <figure>
      <video
        width="1280" height="720" autoPlay loop muted playsInline controls preload="metadata"
        poster={withBasePath('/images/installation/jetson-thor-power-connection.webp')}
        aria-label="Connect the power adapter to the Thor's left USB-C port"
        style={{ width: '100%', height: 'auto', borderRadius: '8px' }}
      >
        <source src="/latest/videos/installation/jetson-thor-power-connection.mp4" type="video/mp4" />
        Your browser does not support embedded video.
      </video>
      <figcaption>Connect the supplied power adapter to the left USB-C port.</figcaption>
    </figure>
  </Step>

  <Step>
    ### Enter Recovery Mode

    Turn the Thor so the **front faces you**. Its three buttons, from left to right, are **Power**, **Force Recovery**, and **Reset**.

    1. Briefly press the **left Power** button to turn the Thor on.
    2. Press and **hold** the **middle Force Recovery** button.
    3. While holding it, briefly tap the **right Reset** button.
    4. Wait a moment, then release the **middle Force Recovery** button.

    <figure>
      <video
        width="1280" height="720" autoPlay loop muted playsInline controls preload="metadata"
        poster={withBasePath('/images/installation/jetson-thor-recovery-mode.webp')}
        aria-label="Hold the middle Force Recovery button, tap the right Reset button, then release Force Recovery"
        style={{ width: '100%', height: 'auto', borderRadius: '8px' }}
      >
        <source src="/latest/videos/installation/jetson-thor-recovery-mode.mp4" type="video/mp4" />
        Your browser does not support embedded video.
      </video>
      <figcaption>The clip starts with the Thor powered on and shows the recovery-button sequence.</figcaption>
    </figure>

    In the next step, confirm that the installer detects the Thor in USB recovery mode before flashing.
  </Step>

  <Step>
    ### Install WendyOS

    Run the installer from your terminal:

    ```bash
    wendy install
    ```

    Follow the on-screen instructions. The CLI downloads a Thor flashpack, detects the Thor in USB recovery mode, and flashes QSPI plus its internal NVMe.

    <figure>
      <video
        width="1920" height="1080" autoPlay loop muted playsInline controls preload="metadata"
        poster={withBasePath('/images/installation/jetson-thor-flash-cli.webp')}
        aria-label="The Wendy CLI detecting a Jetson AGX Thor and showing WendyOS installation progress"
        style={{ width: '100%', height: 'auto', borderRadius: '8px' }}
      >
        <source src="/latest/videos/installation/jetson-thor-flash-cli.mp4" type="video/mp4" />
        Your browser does not support embedded video.
      </video>
      <figcaption>The installer detects the Thor in USB recovery mode and shows flash progress.</figcaption>
    </figure>

    The recording uses `sudo wendy os install`. `wendy install` runs the same installer and requests elevated access when needed.
  </Step>

  <Step>
    ### Boot WendyOS

    After the CLI reports a successful flash, power-cycle the Thor out of recovery mode. It will boot WendyOS from internal storage; leave the data-capable USB-C cable connected to your computer.
  </Step>

  <Step>
    ### Discover Your Device

    Wait 1-2 minutes for WendyOS to boot, then run:

    ```bash
    wendy discover
    ```

    <img
      src={`${(process.env.NEXT_PUBLIC_BASE_PATH || '').replace(/\/$/, '')}/images/docs/cli/discover/devices-thor-dark.png`}
      alt="The Wendy CLI listing a discovered NVIDIA Jetson AGX Thor on the network"
      style={{ width: '100%' }}
    />

    Your Thor is ready for development. See [Discovering Devices](../../device/discovering-devices/) to learn more.
  </Step>
</Steps>

## Next steps

Your Thor is ready. Continue with [step 3 of the quickstart](../../#3-create-an-app) to create and run your first app.